
Tags
4th of july, american flag shorts, DIY, diy american flag shorts, diy clothes, diy fourth of july shorts, diy projects, diy shorts, fourth of july, painted american flag shorts, shorts, thrifting
To continue on with the shorts theme… (see my DIY high waisted shorts tutorial here) The 4th of July is coming up, and I’ve been seeing these cool American flag shorts all over the internet. A lot of them seem to cut up flags and sew them onto the front of the shorts…but I don’t know what the founding fathers have to say about that, so I decided to do a paint version. Sadly mine didn’t turn out as pretty as the ones in the link above, but they’re a fun patriotic DIY and perfect to wear on the fourth!
Step-by-step Instructions
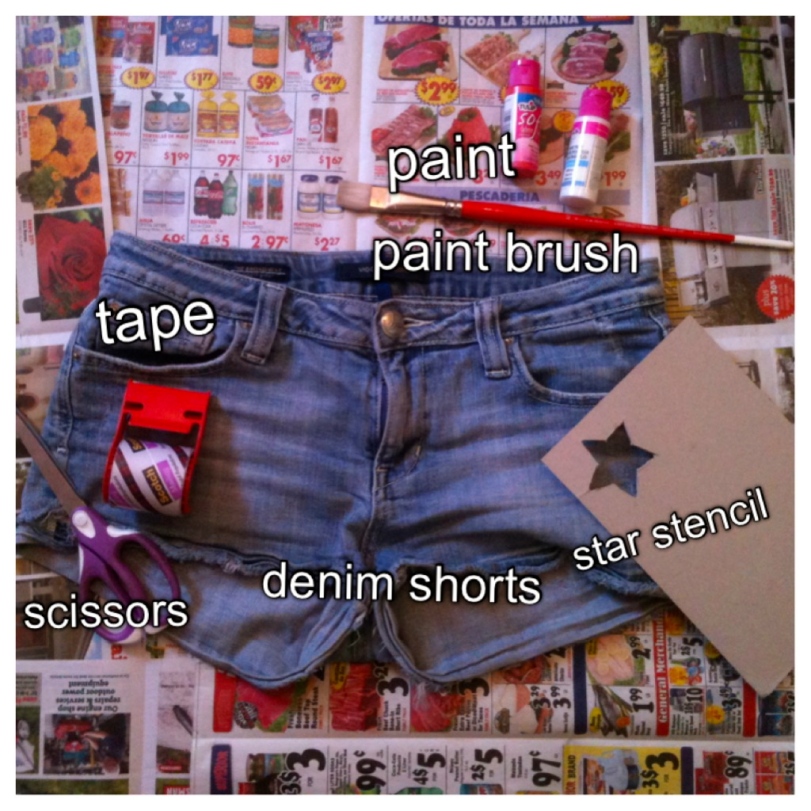
FIRST OF ALL: I like it when the stars and stripes are on the correct sides, so when you’re looking at the shorts make sure to put the stars on the left side and stripes on the right side (opposite if you’re wearing them…)

Next, place your star stencil over the left side where you want your stars…

…and fill them in with paint! Be aware that the paint can bleed under the edges. I started out with this fat paintbrush and pretty quickly switched to a much smaller one to make a finer edge.

You can either do your stars randomly or in a pattern. I did mine fairly randomly

Next, tape off sections on the right side of the shorts. You can do your stripes horizontally or vertically…I chose vertical stripes. Masking tape or painter’s tape would be way easier but I only had packing tape.
Paint in between the pieces of tape with either white or red

Now is a good time to do a second coat of white

Then, after the white dries, put on the red stripes. Don’t worry about making it perfect!

Tada!

Now you have fun and festive shorts for the fourth!
Now, I KNOW I said I like the shorts to look the way the flag does, and I swear mine do but I had to take photos with photobooth, which takes them in mirror image :) oops!

Feel free to share any projects you’ve done recently below!

Nice work. Cutting up an American flag is kind of sacreligious and I like the way you were able to celebrate the 4th and the beauty of the Stars and Stripes without taking a flag apart. Keep up the great work!
Thank you! I definitely agree…I just don’t feel right cutting up the flag haha. Thanks for still reading!
So festive! They look great!
Thanks!!
whwat kind of paint did u use? Just regular fabric paint?
These are adorable!…I can never find/make denim cutoffs that I like but this might be the key.
if you try it out you should let me know! good luck :)
Hey these are on my to do list this week! Love the way yours came out! I haven’t seen any with a cut up flag! That is not right!
that’s awesome! feel free to share yours when you do them!
That looks so awesome! I also made one for myself. I’d be happy if you check it out :)
http://funandoblivious.blogspot.com/
they look great! thanks so much for sharing your pair :)
Awesome! I too, would not feel comfortable cutting up a flag. Did you use acrylic craft paint?
The grid can usually be mounted at different heights. NG in the environment is a “greenhouse gas”, but propane is not
classified as such. Gas grills for professional use
are much more expensive and are bulkier.
The company who started this campaign eventually became the
world’s largest soap company. There are two ways to go about this, firstly, change your diet and secondly use some natural products that help adjust your sugar levels without the side effects. Enjoying success with continuous refinement of the business strategy.
Men usually use aftershave creams or lotions following a good shave.
Face it (pun intended), it’s probably worth getting the Braun 790cc shaver if only to make mornings more comfortable. As you might have guessed the Braun Series 7 790cc Shaver is quite strong in both of these categories.
Love that you put this up! I saw a custom pair w studs that I LOVE, but I’d rather tailor them to suit me than spend $90 for something I can do! Now if it were crocheting or sewing I’d be lost lol.
Perfect for my birthday on the 4th!
Pingback: All Things 4th of July | Simply Kara